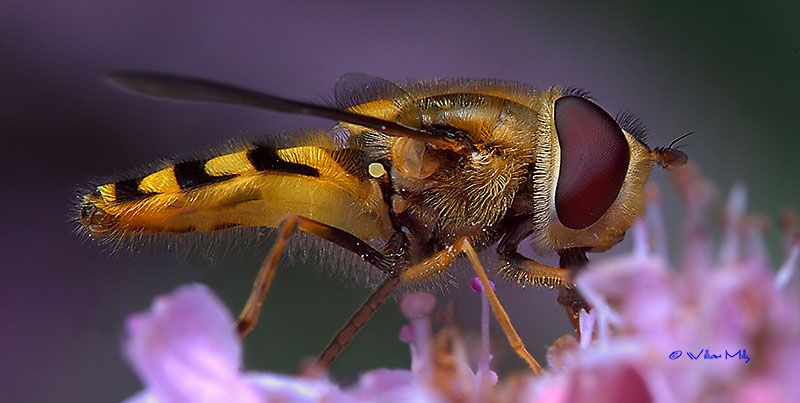
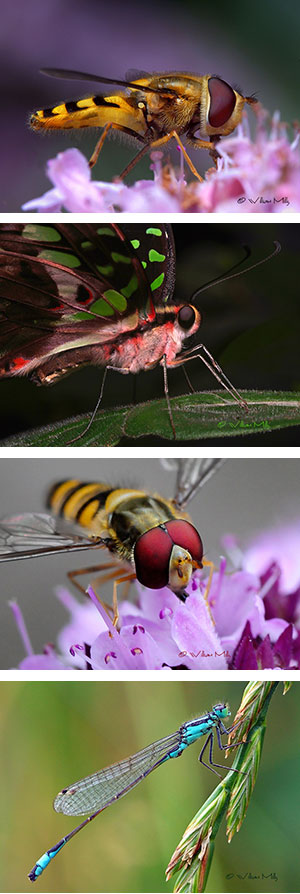
(above) Hover Fly feeding on wild oragano flowers (Macro 105 mm lens, Bowens 750 watt monoblock, full size softbox)
The better name could be ‘Close-up Photography’ because macro means ‘the very large’. Macro Photography is used when the subject appears life size (or greater) in your digital sensor (1:1 ratio). Micro Photography is commonly used when photographing with Microscopes.
The goal in close-up photography is to photograph your subject (which is usually small) using the smallest lens aperture to gain the optimum image sharpness and depth of field. Usually this means you need more light or you have to compensate by extending the shutter speed to obtain the correct exposure.
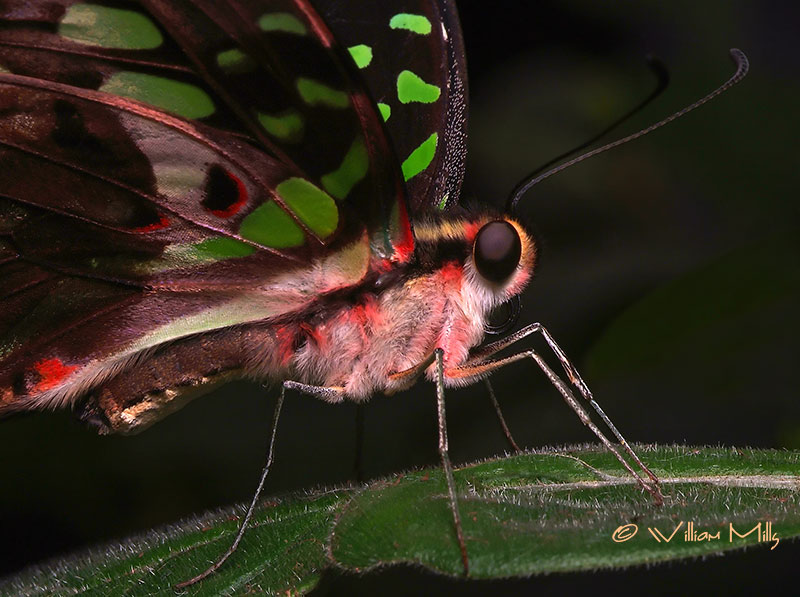
(above) Lime Butterfly resting on a leaf – Dobies Butterfly World (Macro 105 mm lens, SP800 Speedlight, Latolite softbox)
When you use macro or close up lenses your subject is usually very close to the front of the lens. Under these circumstances the depth of field is VERY narrow – usually less than a millimetre – and only a sliver of your subject is in focus. You can increase this by stopping down your lens – making the aperture smaller and thus increasing the depth of field. But at these distances, even maximising your depth of field, all of your subject will still not be in focus. So chances are that you will have to choose the area that is in focus very carefully.
For an insect, you can choose the eyes to be in focus and try to get as much of the body in focus as well. Another technique is to align the insect’s body (usually by moving the camera) parallel to the focal plane of the camera and then maximising your depth of field. This will get the majority of the insect in focus, but as you will see, the wings or antennae (if they are extended out towards and away) will not be in focus.
(above) Hover Fly feeding on wild Oragano flowers (Macro 105 mm lens, Bowens 750 watt monoblock, full size softbox)
Equipment
Macro Lenses
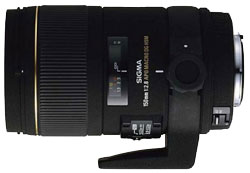
There are dedicated macro lenses that are available in different focal lengths – 50mm, 85mm, 105mm, 150mm, and so on. This just means that they will focus very precisely at different distances from the subject. For an example, the very popular 105mm macro lens will allow you to focus at a good distance from your subject. This is handy when you are photographing a live insect that would tend to fly off if approached too close because you would have to be close when using a 50mm macro lens. A 150mm or a 200mm macro lens would allow you to achieve a macro focus at an even greater distance away from your subject. I use an older 105 mm Macro Lens from Sigma, that does not have the very quick focusing HSM (hypersonic focusing) or the newer OS (optical stabilizing) technology, and it can be a bit of a challenge to focus on to a quick moving hover fly or other insect that only stops to feed for a second. But the newer fast focusing, stabilized lenses can be quite expensive (105 mm £499, 150 mm £800 +).
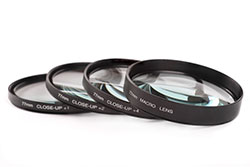
Close-up Lenses (supplemental filters that magnify)
These screw onto the outside of your lens and allow you to focus more closely. They come in different dioptres (strengths) and are a cheap option (£20 on eBay for a set of 1x, 2x, 3x, 4x, 5x, 10x). The down side is the quality of the CU lens used may degrade the image somewhat and the edges may go out of focus quickly.
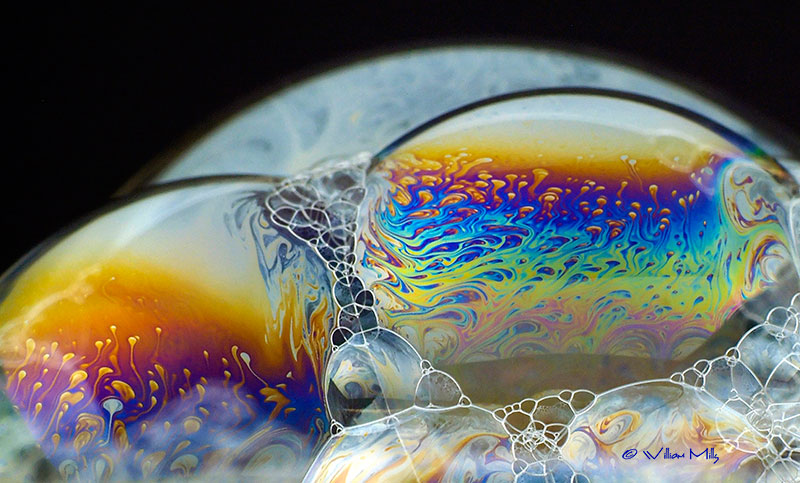
(above) Soap Bubbles in a shot glass (Macro 105 mm lens, Vivitar 283 flash)
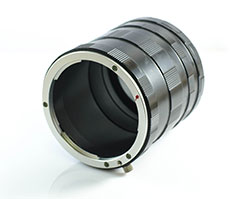
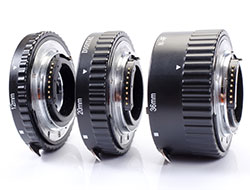
Extension Tubes
These are simply hollow metal tubes that fit between the camera and your lens. They usually come in sets of 3 (different sizes) and can be used in different combinations. All they do is extend your lens away from the body of the camera and have the same effect if you moved a projector further away from a screen – the image gets larger.
The cheaper ones do not connect electrically between your camera and your lens. They just have the bayonet mount on each end. I have even used a toilet paper tube with some duct tape to the same effect. You can get auto extension tubes that have all the electrical connections and the features of the lens will remain intact – TTL, focus, and f/stop – for each of the main brands of cameras.
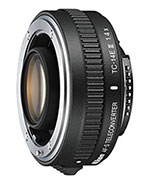
Teleconverters
These are basically an extension tube with a (magnifying) lens inside. They multiply the mm of the lens that they are attached to by either a factor of 1.4 or 2.0. They come in manual or auto versions. The 2.0 effectively doubles your focal length, so a 50 mm lens becomes a 100 mm lens and a 150 mm becomes a 300 mm lens. Which means you can focus from further away. The down side is the amount of light is halved, and your camera may have difficulty in focusing in the lower light conditions.
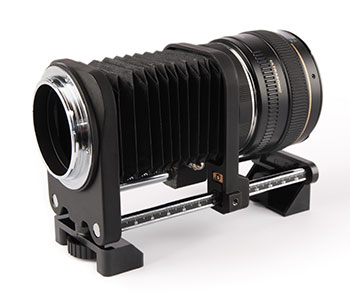
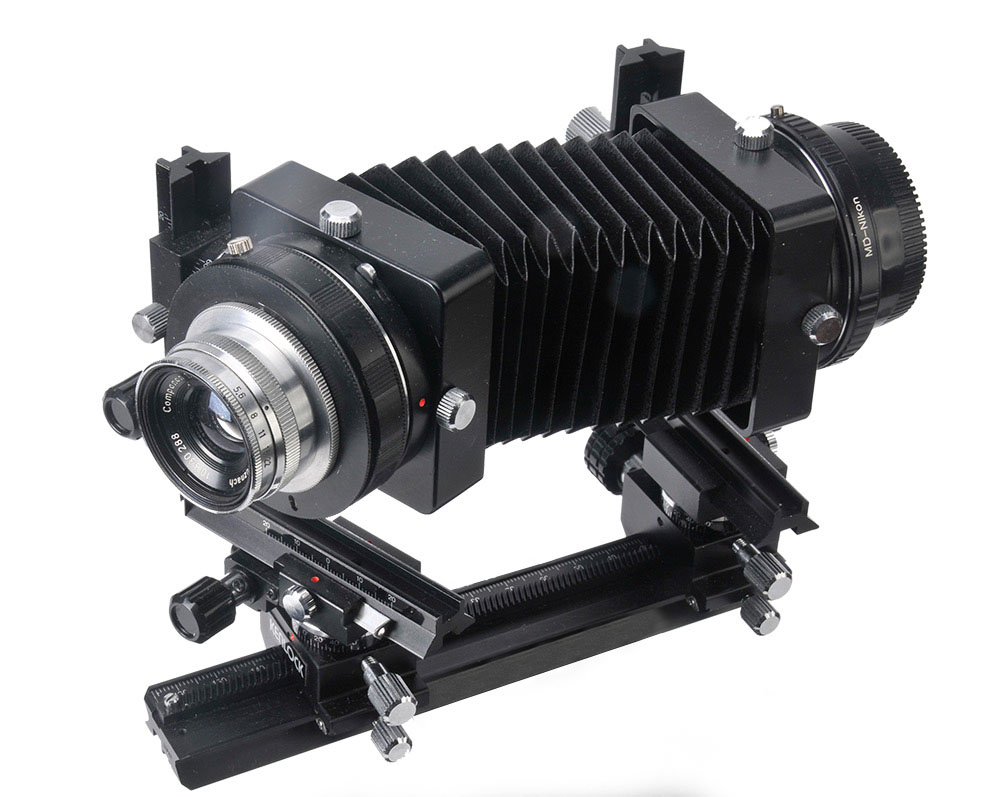
Extension Bellows
These are similar to the extension tubes, but allow you to vary the distance between the camera and the lens using the bellows and a rack. They are more suited to the studio than the outdoors because they are fairly bulky and the bellows can be damaged easily.
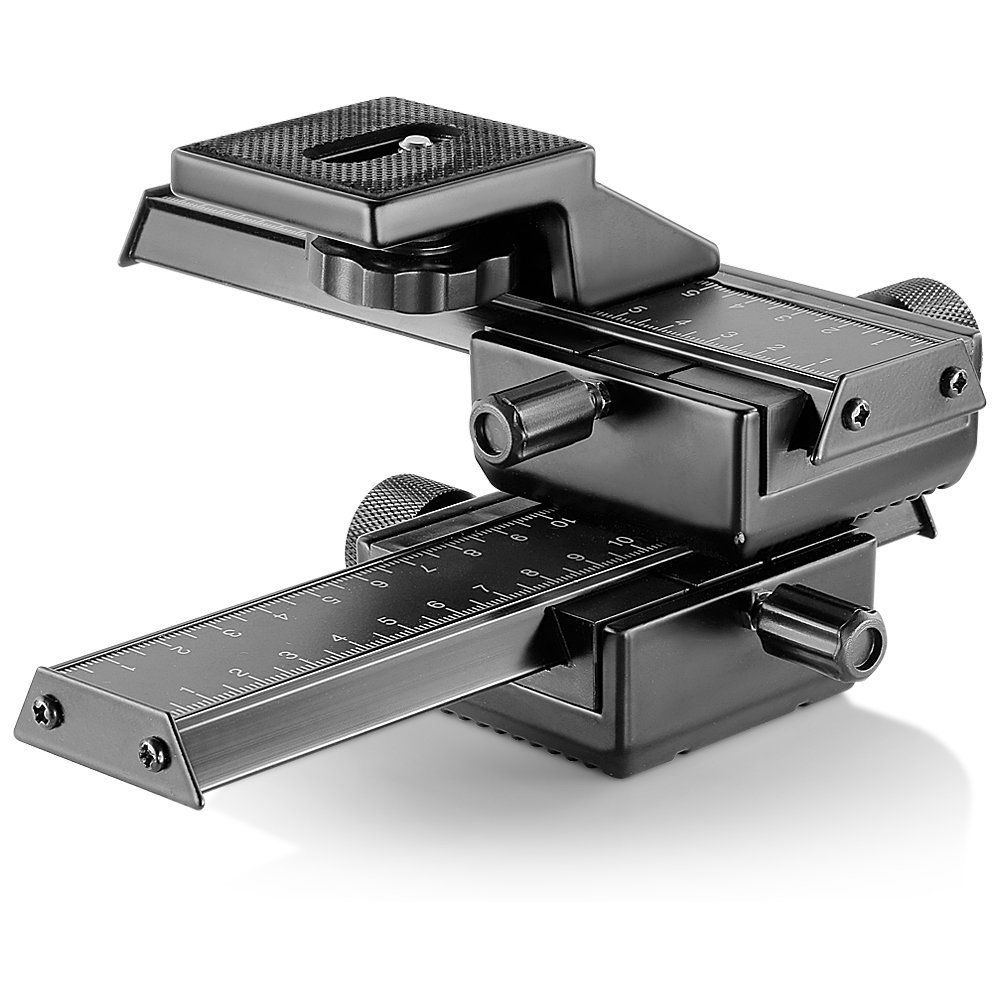
Another item that is more suited to the studio that makes it easier to do macro photography is a geared rail for your camera. It goes between the camera and the tripod. It allows you to move the whole camera back and forth very precisely so that you do not need to keep moving the tripod. There are double rails that also allow you to move left and right, as well as back and forth.
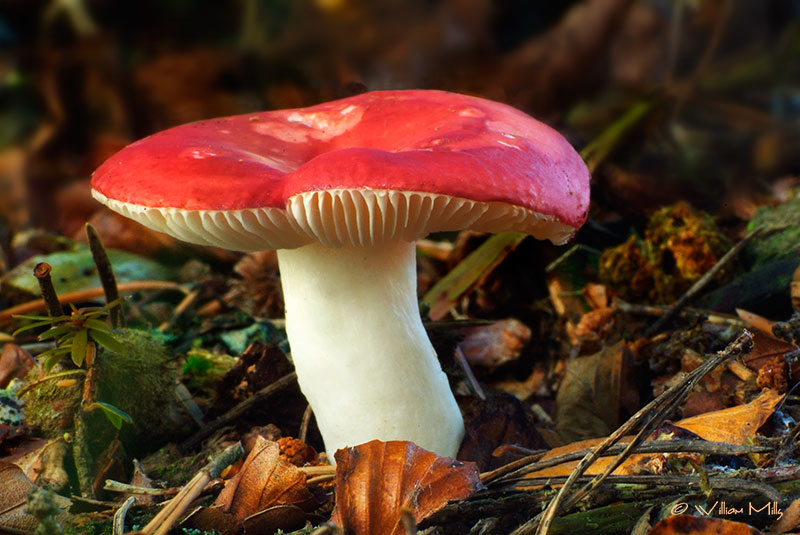
(above) Wild Mushroom in the woods (Macro 105 mm lens, light reflector)
Lens Reversal Rings
These take advantage of the fact that if you reverse a lens, which normally takes a large scene and reduces it to the size of your sensor if you reverse the lens, it takes a small scene or subject and enlarges it and the sensor only gets the middle of the image, which is now larger. The lens is no longer in auto mode, but in manual mode as far as exposure and focus goes. But you can pick up a reversal ring for a few pounds. You need the thread size of the lens in mm, and the other side of the ring will have the bayonet type of the camera that you are using (Nikon, Canon, etc.).
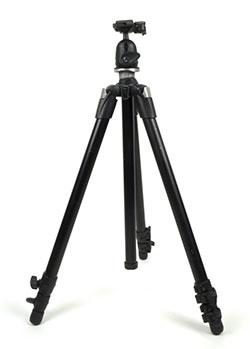
Tripod and Shutter Release Cable
If you find yourself using slow shutter speeds – a shutter speed expressed in a fraction of a second that is less then the mm of the lens. For example a 105 mm macro lens – any shutter speed that is slower than 1/100 second, is considered a slow shutter spead for hand held photography. There is a chance the camera movement will make the image soft. At these shutter speeds or slower a tripod and a cable release (or remote trigger) are essential equipment. There is nothing better than a sturdy tripod when it comes to getting a sharper image. Additional camera movement when using slower shutter speeds can even make the images blurred, and the slap of the mirror (behind the lens) and pressing the shutter can add to this. Using a tripod with a shutter release cable will minimise any movement. This is great for all subjects that do not move.


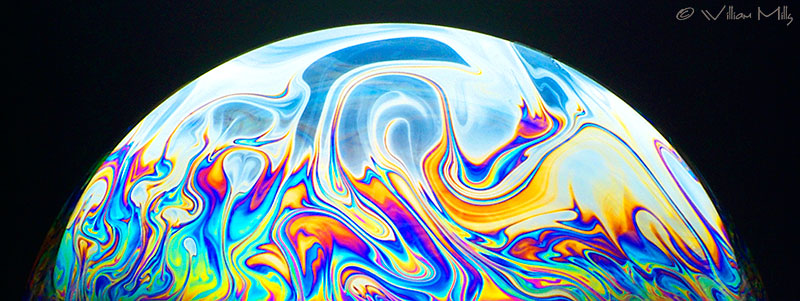
(above) Soap Bubble in a shot glass (Macro 105 mm lens, Vivitar 283 flash)
Macro Flash
Macro flashes and their increased light levels allow you to close the lens down and increase the depth of field, which really helps with macro photography. You can use your own flash on your hot shoe, or on a bracket, or hand held – connected to your hot shoe with a cord, but you have to be careful as your flash will give quite harsh light and can result in flair spots or burned out areas on your subject, as well as a heavy shadow. The best thing to do is to diffuse the flash light somehow. With a tissue cloth or a softbox (see below).
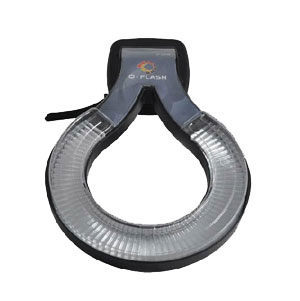
There are several flashes designed for macro photography. They inclue “O Flash” diverting types that can be used in conjunction with the Speedlight (flash) that you may already own. They have a ring that goes around the end of your lens and a tube that diverts the light from your flash down to the ring to give a soft light that lights up your subject evenly. I find them a bit bulky to use (occasionally it fell of the flash) and there is a small drop in the amount of light. But they can be used in through the lens flash metering automatic exposure.
There are also dedicated ring flashes. They are in 2 parts. The first part is the power supply that clips to the camera’s hot shoe and with a coiled cord, they are attached to the second part, which is a ring with 2 flash tubes (or multiple LEDs). It fits onto the front of your lens. Usually about £50 to £190. the cheaper ones have a manual flash control for power output, and the more expensive dedicated ones have through the lens flash metering that will expose the light for your subject. The light may be a little harsh.
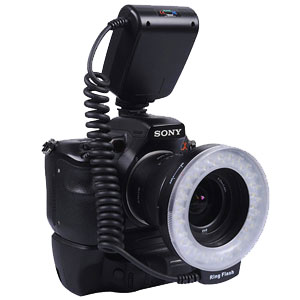
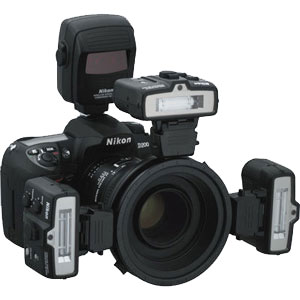
Nikon and Canon and others make a dedicated macro flash that works on the same principal as the one above, but they have 2 or 3 mini flashes that attach to the front of your lens. These tend to be very expensive (£600+), but the advantage is again they are fully automatic – through the lens flash metering. Which makes it a lot easier. As well as getting a nice lighting balance. A straight flash without some sort of diffuser tends to be a little harsh.
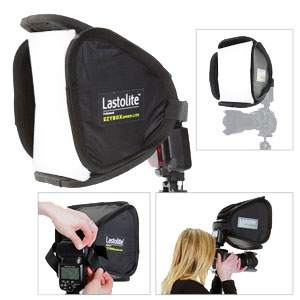
There is also a mini softbox from Lastolite (Manfrotto) (that fits on to any flash or Speedlight) that I find very handy. You can bring the softbox fairly close to your subject, which allows the subject to be well lit. It gives a nice soft diffused light. The larger the light source compared to the size of the subject, the softer the light. And if you compare the size of this mini softbox to a hoverfly, it is like lighting a model in the studio with a 30 foot softbox. Wonderful soft even diffused light for your subject.
Reflectors and Diffusers
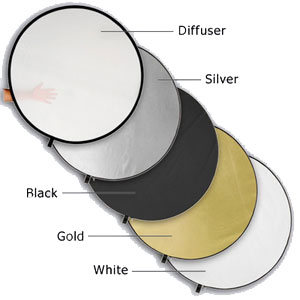
When out in the field photographing everything from insects to flowers to mushrooms you can bring along an inexpensive reflector and direct the light onto your subject to increase the light level naturally. Some reflectors come with a removable surface that leaves a diffusion material in case your subject is in bright sunlight. You can then diffuse the sunlight through the material onto your subject so that you do not get the highlights and harsh shadows that direct sunlight gives.
I have a few of these multi material reflectors, that have white, gold, black, and silver material that zips over a diffusing material base that is attached to the hoop. It folds away to a very small size and has a pouch. I find this to be the most versatile and least expensive of the light modifiers, One method is to use a small tripod, and set your shot up exactly the way you want, this will free your hands to position the reflector or diffuser, and use a remote shutter release cable to trigger the camera.
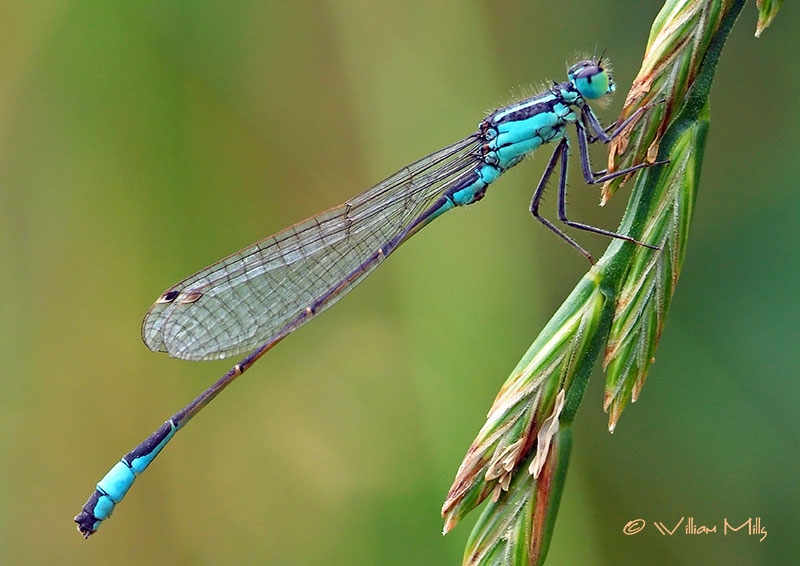
(above) Damsel Fly clings to stalk of grass (Sigma 18 – 200 mm lens, natural light)
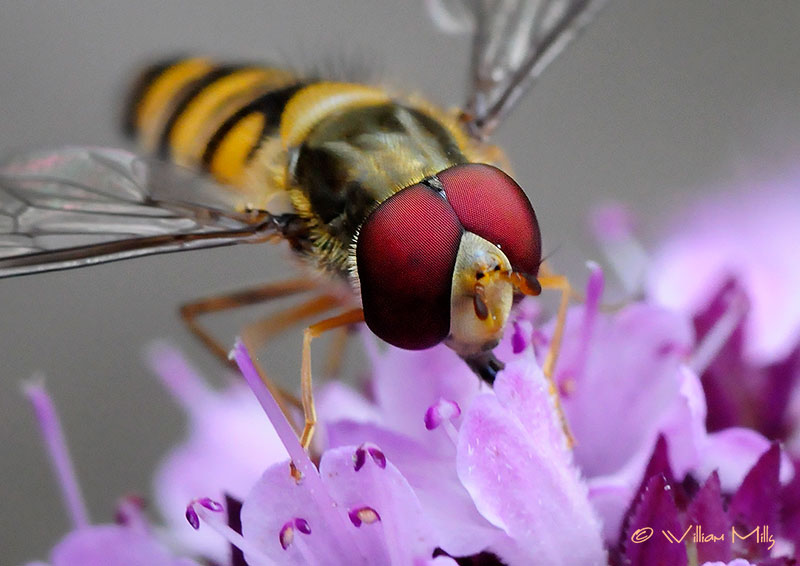
One of the ways to deal with this when taking regular macro photography shots is to align your subject in line with the focal plane of your camera. Since at normal macro shooting this effect is pronounced but still not extreme. In using the above examples of Macro Photography in this article, you can see this effect in my first image of the hover fly (right). The body of the fly is parallel to the focal plane of the camera and is nicely in focus.
The same goes for the second image of the Lime Butterfly (right). The insects body is parallel to the plane of the camera and in focus all along it’s length.
The third image is of another Hover Fly (right) and it is no longer parallel to the focus plane of the camera and as a result I focused on the eyes of the fly and as you look down the length of the body you can see the further you go back the more out of focus the body becomes. Keeping in mind that this image was shot with a very large studio light and a large softbox and probably at f/22 for maximum depth of field possible. And even under the best conditions with normal macro photography you do not get much DOF.
Again with the forth image of the Damsel Fly (right), if any of the fly’s body would have been anywhere other than parallel to the focal plane of the camera. It would not be in focus. And being such a long insect this is the only way to get the entire insect in focus.
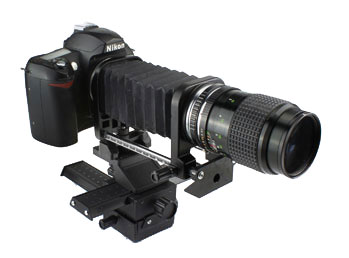
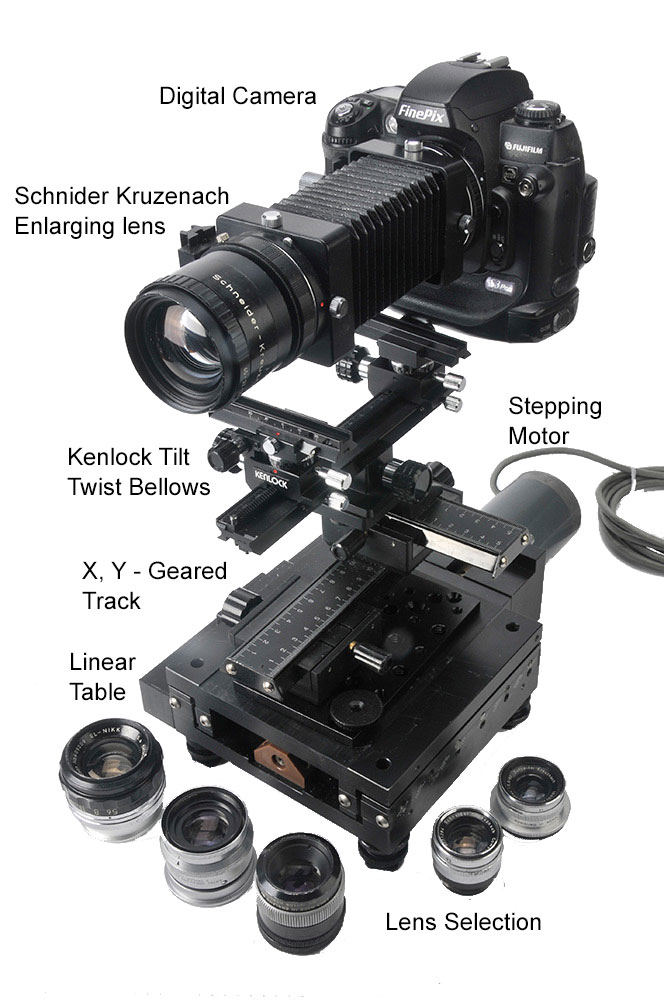
Another way I found to work quite well when photographing regular macro photography is to use a Kenlock Tilt / Shift Bellows. Not only can you tilt the lens up and down but also tilt it left and right, and the same movements with the camera at the other end of the bellows. This enables you to tilt the focal plane of the lens and/or camera to match your subject. I also use this device when doing landscape photography as it allows all the same movements and advantages that my 4×5 camera has, but for my digital camera. I can also raise and lower the lens and or the camera, to remove unwanted objects in the shot when doing architectural photography. A very versatile tool.
Extreme Macro Photography
There is a whole other world that we cannot not see with the naked eye. With advances in technology especially photographic equipment, computers, and microprocessors it is now possible to see and even to take fabulous pictures the previously unseen. A visual world that most people never new existed except for naturalists or scientists.
The challenge with extreme macro photography is the more you magnify your subject, the smaller the “Depth Of Field” or range of what is in focus, becomes. The more magnification the narrower the DOF. At the extreme end of magnification, the DOF can be as thin as a sheet of paper. This proves to be problematic when your subject has only a very thin slice that is in focus. In front of and behind this focus plane it will be increasingly out of focus.
Extreme Macro Photography – The Camera End
To over come this inheritant issue of extreme macro photography you can take many photographs moving the camera closer and closer along the subject starting from the front to the back and using focus stacking software such as ImageJ (free), or CombineZP (free, Windows only), or Picolay (free), or try Affinity Photo (49.99) or the somewhat pricey Helicon Focus (30.00 – 240.00), or the excellent Zerene Stacker (39.00 – 289.00).
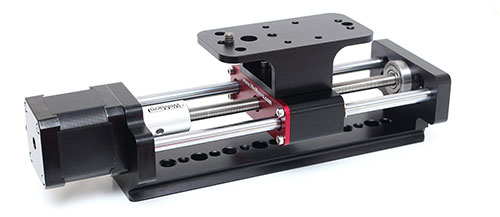
When photographing something as small as the eye of a fly as the whole subject, you will need some sort of device to move the camera in very small increments each time. This can be done manually using a bellows and camera on a dual rail (4 way) geared track, but it would be a monumental task to take a few hundred shots moving the rail ever so slightly each time. On the other hand they are great for the final fine positioning the camera – bellows – lens to your subject for extreme macro photography. These 4 way geared tracks can be bought for as little as 15.00 on eBay.
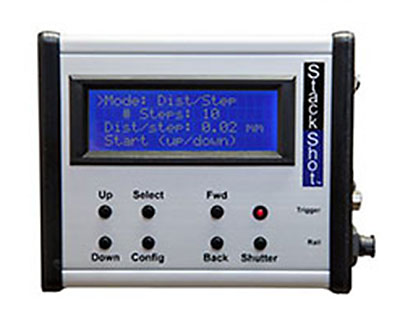
Cognysis Stackshot
A much better method is to use an automated system like the Cognysis Stackshot, which is a stepping motor attached to a worm geared screw with a place to mount your camera. It comes with a controller, and works with Helicon Remote and Zerens Stacker software. The rail is available as either a 100mm Rail, or a 200 mm Rail. It allows you to reduce the size of the steps to as small as 2µm (2 microns). The controller allows you to set the size of the increments, the number of shots, the start position, the total length of the “run” and also to return to the start position when it has completed the set.
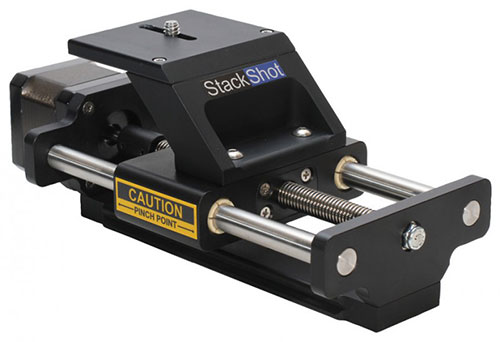
Once the set-up has been entered, the controller is connected to the camera with a remote cable, and fires a shot, then after a set time it moves the camera a precise amount forward, and takes the next shot and so on until the set is complete – all automatically. They are fairly expensive at around 600.00, but previously owned ones (the new eBay term for used) do come up on eBay on occasion for somewhat less.
Wemacro Rail
Another option is the less expensive Wemacro Rail available from Wemacro. Which is another automatic focus stacking rail, with a total travel length of 100 mm. The minimum steps can be set as little as 1 micron in precise mode. It is fully controlled by a computer or an android phone or an iPhone. It is currently on sale for $249. They also have a good selection of Microscope lenses from 4x to 10x and adapters and accessories available. It also works with Helicon Remote Software (Windows only).
Alternative – DIY
For those that like to tinker with technology and achieve the same results for less. You can pick up a linear table (worm geared) for a reasonable cost, and you can add a stepping motor and connect it to a Arduino Microcontroller which in turn is connected to your camera. You will need to program the Arduino to do similar steps as the Stackshot does. But if you like this sort of thing it is very possible and there are lots of help on the Internet. One of the best information resources and inspiration for macro photography is Extreme Macro. This website by by Johan J Ingles-Le Nobel is a true wealth of information on every aspect of this field.
A good source for information to make your own automatic stepping macro rail controller using a Arduino Microprocessor is Rylee Isit’s website where he details all the parts and the wiring and the software coding for the Arduino Controller.
This is one of my set-ups that I have put together myself.
Coming Soon –
Extreme Macro Photography – The Stage End
Extreme Macro Photography – Lighting and Background
Extreme Macro Photography – Putting It All Together
Extreme Macro Photography – Finally Producing Images
RESOURCES
Photomacrophotography
DIY Macro Focusing Rails – Pintrest
Macro Photography Inspiration – Flickr – Andrea Hallgass
SUGGESTED SUBJECTS (w / size)
Stinging hair of a common nettle (.02mm)
Heather flower head (7mm)
Butterfly wing scales
Moth Wing Scales
Mold on fruit
Jumping Spider
Eye of – flies, bee / wasp, or any insect
Peacock feather / Bird feathers